
You are currently browsing the monthly archive for October 2009.
This recipe is a pretty good ‘un, in my opinion (I know, I know, who asked me?). Not only does it taste good, but it’s got veggies in it and it’s a way of naturally colouring your food without using chemicals. Now, there’s no way anyone could suggest I’m not up for dying food whenever I get the opportunity, but somehow it seems wrong to dye savoury food. Don’t know why! When you introduce sugar, all the bets are off…
Also, once you’ve softened your veggies, you bung the whole lot into rice cooker and let it cook. Easy! Obviously, you don’t have to eat this in a bento – it makes a great addition to a hot meal, too.
I really like this bento box – I have a thing for single tiered boxes. I also love Animal Crossing. I don’t know if the box is still available, but I bought it from J-List. (If you click that link, you’ll be taken to the J-List site, so if you buy anything, it earns me pennies to buy new bento stuff! Thank you!)

Recipe for carrot and onion rice
Ingredients
- 2 cups raw rice
- 1 carrot
- ½ onion
- Butter
- Splash soy sauce
- Seasoning
Method
- Process the onion and carrot until they are finely chopped, then sauté in butter until softened – but not browned. This will take around five minutes. Season and add the soy sauce.
- Add to a rice cooker with washed rice and an equal amount of water, and cook as normal.
Risotto isn’t one of those quick and easy, on the table in 20 minutes kind of dinners. You have to stand there and cook and stir and add stock for a looong time. But you know, when it’s dark and wet outside and you’re kind of fed up with everything, that’s okay. Sometimes you just want to stand there and stir something.
This roast chicken risotto recipe used to be my number one method of disposing of a dead body. There’s nothing like it to get rid of the evidence you had a chicken for your dinner than using it up in this delicious, simple risotto. But now I’m cooking a chicken every week, it would get a bit samey. If you try this, though, you’ll see why it’s my number one chicken disposal plan.

Roast Chicken Risotto
Ingredients
- Knob of butter and a splash of olive oil
- 1 onion, finely chopped
- 2 cloves garlic
- 350g risotto rice
- 1 glass white wine
- 1.5 litres simmering stock (chicken would be best)
- Cup of frozen peas, defrosted
- Leftover chicken – half a chook max
- 50g grated parmesan
Method
- Melt the butter and add the olive oil to a big pan. I use a giant saute pan to make my risotto.
- Cook the garlic and onion together until translucent.
- Stir in the rice until coated with the butter.
- Stir in the wine and cook until evaporated.
- Add a ladleful of stock and stir, stir, stir – ever so gently – until the stock is evaporated. Then, repeat the process until you have just one ladleful of stock left. This is boring and dull, but not all cooking is about flamenco dancing around the kitchen with sharp knives, slicing lemons and throwing them at a great distance into fiery cauldrons of magical stew.
- At this point, add your chicken and your peas. I haven’t specified how much chicken, because this is a recipe for leftovers and that would, frankly, be madness. Who wants leftovers from a leftover recipe?
- Cook for five minutes, then stir in the parmesan cheese and serve.
Serves four adults.
I’m getting so excited about Halloween! Is anyone else planning a party to celebrate the spookiest night of the year? I’d love to hear your plans – what are you going to cook? What are you going to wear?! Leave a comment and let me know… I’m dying of curiosity!
You might notice that, in the spirit of the event, I’ve added a handy new link to your left, which when clicked, will lead you to all my posts with the category ‘Halloween’, so if you want to find the Halloween marshmallow recipe, my pumpkin fondant tutorial or anything else to do with Halloween, you know where to find it! Throughout the year I’ll be changing this to reflect the seasons, the holidays, and my latest obsessions!

This year, my menu is nowhere near organised… but I do know what my costume will be. Thanks to a quick shop in Primark, I will be an ’80s zombie, complete with acid yellow dress, purple tights, orange legwarmers and a heck of a lot of purple accessories. I am perfecting my moaning noises every morning whilst getting up, I assure you! And I have a magic lipstick that looks green but turns pink when you put it on. Now, how scary is that?
Pst – I’m totally honoured to have been featured in Indie Fixx’s ‘Halloween Tutes from Around The Interwebs‘ – in the same list as Martha Stewart, no less! Watch out, Mazza…
This weekend I’ve had the pleasure of spending a lot of time with Life is Sweet, by Hope and Greenwood, which is, as it so rightly says on the cover, a collection of splendid old-fashioned confectionary (buy it if you get the chance! It’s very reasonably priced and ever so good). I’ve made marshmallows, fudge and cinder toffee, and although the cinder toffee wasn’t the best I’ve ever tasted, I was particularly pleased with the fudge. However, as Halloween is coming up, I thought I’d make some spooky Halloween marshmallows by colouring them purple. The vanilla marshmallow recipe in Life is Sweet is unfortunately misprinted and the ingredients list is screwed up, so I’ve adapted my own from the recipe for Mallows D’Amour. There are a few technical aspects to this recipe which might prove difficult – you need a stand mixer (although I did experiment with an electric handheld whisk, and the patient might just be able to cope like this, holding it for around 15 minutes!) and a sugar thermometer. I had to borrow both of these, but a sugar thermometer is a great investment for making fudge, toffee, caramel and jam.

Halloween Marshmallows (adapted from Mallows D’Amour, Life is Sweet by Hope and Greenwood)
Ingredients
- 450g (1lb) granulated sugar
- 1 tbsp liquid glucose
- 1 sachet powdered gelatine
- Good dab of purple colouring paste (I used Wilton’s Violet)
- 1 tsp vanilla extract
- 2 large egg whites
- Cornflour and icing sugar, to dust
- Purple sugar/black stars or any Halloween themed decorations
Method
- Line a 20cm/8inch square baking tin with baking parchment or greaseproof paper and dust with cornflour and icing sugar. I’ve found you need a heck of a lot of this to keep the marshmallow from sticking.
- In a deep, heavy bottomed saucepan, add the sugar, glucose and 200ml of water and stir. Place over a medium-high heat and add your sugar thermometer. Keep cooking until the temperature reaches 127C or 260F. This could take 15 minutes or as long as 25, so keep an eye on it.
- Whilst this is happening, put 100ml of boiled water in a bowl and sprinkle over the gelatine. Stir well until dissolved. This will really smell. Gelatine is not suitable for veggies, and from the smell of the gelatine, you will know why. Don’t panic, the smell goes away, and there is no taste of the gelatine whatsoever in the finished marshmallow. Now that would be Halloweeny…
- When your gelatine and water is mixed well, add the vanilla and a good dab of purple colouring. For Halloween, you could also try black, orange and green – just remember that the colour will fade because of the egg whites, and the dusting of sugar and cornflour. When you add the food colouring, you should get a very dark colour. So much that you are secretly thinking ‘oh dear, I put too much in’. This will most likely give you a subtle shade…
- When your syrup has reached the right temperature, you need to have a little panic attack and start jumping up and down and worrying you’re not ready. Don’t worry if you haven’t mixed your gelatine yet – I did this and it turned out all right. Just add it to the pan of sugar syrup and mix well. It’ll bubble, so watch out.
- Get your stand mixer and whip the eggs until stiff peaks form. Turn the mixer down as slowly as it will go, and add the syrup and gelatine in very gently. Slow, slow. This could take a while… The heat from the syrup is heating the egg whites, so if you pour it on too fast, it’s likely the word could implode.
- When you’ve done this, you turn the speed up to superfast and leave to beat for at least 15 minutes. The mix is ready when it holds onto the whisk well, and is thick and shiny.
- Pour into your dusted pan. Leave it to set for a long time – the book says 2 hours, but I’ve left mine overnight before.
- Turn the marshmallow out onto another dusted piece of parchment paper. If you’re like me, the mix will still have stuck to the bottom of your originally dusted piece of paper, so dust all sides until nothing is sticky. Then, slice and dust, slice and dust, into whatever shapes you like. Once you’ve dusted your marshmallows, you can shake off the excess coating by throwing them gently from hand to hand. Store in parchment paper.
- Serve with edible sugar, as above, or with anything suitably Halloweeny…

How about black sugar stars, like the first photo? Or purple sanding sugar, like the photo above?Or, if you want to be more sophisticated, why not keep your mallow mix white, and then decorate with tiny gold stars? (I got mine from Jane Asher’s site.)

These are too good to give to Halloween trick or treaters…
A couple of weeks ago, I decided to have a go at making some cute little pumpkins to go on top of Halloween cupcakes.

These are easy to make and don’t require any equipment beyond fondant, orange dye and toothpicks. (And green and brown dye if you want to make stalks, leaves and vines.)

If you have orange fondant, well, you’re one step ahead… Hurrah! If you want them to be hard, you should make them a couple of weeks before when you need them, so you can sit them in a cool, dark place to set.

First of all, roll your fondant into a small ball, then squash it down so it makes an oval. This will give it a much more interesting shape than a plain old sphere.

Now it’s time to use your specialist equipment. First of all, pierce the centre to mark it. Then, rolling the toothpick, create a dimple in the centre of your ball.

There you go – now you’ll have what looks like an orange doughnut gone wrong.

Now, use your toothpick to create lines from the centre down the edge of your pumpkin, using a rocking motion. I do this by doing the four compass points, then filling in the spaces in between.

Like so! With the heat of your fingers, your pumpkin might get a little floppy. You can fix this by placing it in the fridge at any point if it starts getting hard to handle. Don’t be a pushover for a vegetable made of sugar.

That’s pretty much it! You can add a stalk (I’ve seen people use cloves for this, but obviously they’re not really edible like that) or even make a curly vine from green fondant curled around a matchstick.
Too cute to eat? Never!
I am so behind on my chicken recipes… I took a week off because of my birthday and I’ve got a lot of catching up to do. Especially considering how dark it’s getting recently – I’ll have to do all my chicken recipes at the weekend or during the day on my days off…
Anyway, this recipe is a bit of a weird one – a whole chicken baked in milk with lemon zest, garlic and sage… Courtesy of Jamie Oliver (again) from Happy Days with the Naked Chef. I’m starting to think that Mr. Oliver is the king of the whole chicken – I thought it was Nigella that was always roasting a bird…
Here’s the costing.
Tesco Organic chicken : £7.27
Half pack of butter (!) : 47p
Bunch sage : 68p
Half a cinnamon stick: from cupboard
2 lemons (unwaxed): 62p
One bulb garlic : 30p
1 pint milk : 45p
Grand total : £9.79.

There’s the chook – another organic one. Mr. Oliver – do you have shares in an organic chicken farm…? I never can tell the difference. Will I be lynched for saying that? It seems like a foodie crime.

This recipe makes me weep – look at that giant block of butter at the back there. Guess what you do with that beauty? Use it for frying and then…. throw it away. Oh no, I don’t think so! I used some of it to cook some pink fir apple potatoes, and very nice they were too. Throw it away, psh.
Right, so the first thing you need to do is turn these:

into this…

Looking at the picture for Jamie’s version of this, his lemon zest is more like lemon peel. I did try to do it like that, but my knives defeated me.

So these are the flavourings of your chicken in milk. Cinnamon, garlic and lemon zest – and of course, your sage.
Get your butter, melt it in a pan, and then brown the chicken off. There’s a lot of butter and the chicken is very big and delicate, so it’s slightly easier said than done to move the chicken around in the pan without breaking its skin. I ended up using two wooden spoons like a pair of forceps.

Did it in the end though – and doesn’t it look delicious? DO NOT EAT, though – this is slightly underdone…
Chuck away the butter (sob sob) and then return the chicken to the pan with the half a cinnamon stick, the sage, the zest of two lemons, the 10 cloves of unskinned garlic and the milk.

Looks appetising, but kinda weird.
Now, you roast and baste, roast and baste. Roast and baste for an hour and a half, which is the standard cooking time for roasting a 1.5kg bird (see, I’ve learnt something!). If you’ve diligently basted and roasted, this is what you end up with:

Looks pretty exotic, I think! The idea is that the lemon zest slightly curdles the milk and you end up with a split lemony milk sauce which you eat along with the chicken, some mashed potatoes and some wilted greens. We ate ours with roasted pink fir apple potatoes and some spinach.
The milk sauce didn’t split that much. It was very unusual, to say the least – pretty much what you would expect when you infuse garlic, lemon and sage in milk. The cinnamon didn’t show up so much – I blame it on the fact that cinnamon sticks really vary in how long they are. Is that a foodie joke: how long is a cinnamon stick?

The scores:
M gave it 7.5. He said it was ‘all right’. This is his standard answer to things when he doesn’t know what I want him to say.
I gave it 7. It was nice, very unusual, but I can’t see the point of doing it other than it was exotic and weird. Maybe the lemon didn’t really work so well for me, because the sauce was just a little odd. Nice, but the kind of thing you’re not totally sure about and stop eating halfway through. Maybe a bit rich…
On the other hand, it did provide me with a pint of curdy lemony milk and chicken stock which I used in a potato soup, and some creamy chicken flesh that went really nicely in a risotto…
Teriyaki burgers might sound kind of outlandish to most western ears, but the sweet-savoury flavour of teriyaki sauce works really well with the beef burgers. I really like eating this as a main course with broccoli, but you can also eat it cold in your bento box as here. I’d make extra for dinner and then pack mini burgers for lunch the next day! I’ve also packed cold broccoli and cauliflower in here – not only are they nice cold (just try it – but don’t overcook them; nothing worse than cold, soggy veg!) but they look really nice as garnishes.

Recipe for Teriyaki Burgers
Ingredients
- 1 onion, finely chopped
- Butter
- 200g minced pork
- 300g minced beef
- 25g breadcrumbs
- 75 ml milk
- 1 egg
- Salt and pepper
- 4 tbsp mirin
- 4 tbsp soy sauce
- 4 tsp sugar
Method
- Sauté the onion in butter for five minutes until softened. Add to the pork and beef (remembering to cool it first unless you’re cooking right away) and mix.
- Add the milk to the breadcrumbs and allow it to absorb the liquid. Then, add this along with the egg and seasonings to the onion and meat mixture, and mix well.
- Form the mixture into bento sized hamburgers. You should be able to get 23 small hamburgers from this – you can vary the size depending on how many you want to fit in the bento.
- Chill in the fridge for an hour to set, then remove and fry gently in oil until they are cooked through.
- Meanwhile, in a separate pan, heat the mirin, then add the soy sauce and sugar. Simmer until thickened, then pour over the burgers.
- Allow the sauce to coat the burgers, and cool. The sauce should glaze the meat as it gets cold.
- This will make enough burgers for two people for dinner and two lunches the next day.
For my birthday, I decided I wanted a tea party, complete with cute little cup cakes and triangular sandwiches. Originally I was going to buy the sandwiches, but I couldn’t bring myself to spend £20 on a plate of them when I could make them myself for half the price. So R and I made batches of cream cheese and smoked salmon, rare roast beef with horseradish mayo, Belgian ham salad with dijonnaise and cheddar cheese with red onion chutney. Delicious!
But of course, I had to do something with all my cake decorating goodies!
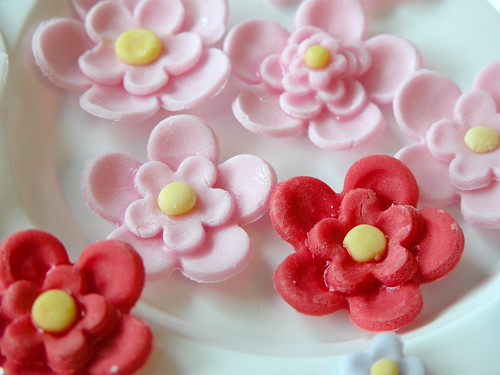
So R and I dyed some fondant with the Wilton paste colours I bought at Hobbycraft, and rolled it out. Then, we used the set of four blossom plunger cutters from PME to cut out these cute flowers.

I also tried out making a patchwork effect on some of the flowers using a spice brown food colouring pen. What do you reckon?

It worked well using that colour on the pink icing, because it turned a slightly darker pink. I’d like to play around with this idea more on other projects.
One of the things I really wanted to try from Peggy Porschen’s Cake Chic was her anemone flower – if you have the book, you might have seen it on the back on the cover. Everything I needed except the veining tool turned up from Jane Asher, but the anemone cutters were much smaller than I had thought they’d be. But as you can see, the flower still turned out pretty well!

I decided to use ivory lustre powder instead of a pink blossom tint on this, and I think it came out quite well! The only thing is, the petals were very delicate and the whole thing got stuck in my palette when I tried to remove it. Totally tragic! But, I like the effect so much I might try doing the same thing with red petals to make poppies. The only things you can’t eat about this flower are the stamens, which are made of wire.

Here are the flowers sitting in the palette, drying off and getting a bit of shape to them. This is just a cheap plastic artist’s palette from eBay, which only cost a couple of pounds including postage, bonus! The perfect shape for little flowers. Don’t they look sweet? I’d leave them here if I didn’t have a load of cakes to decorate!

And here they are! Peggy Porschen’s cupcake and buttercream recipes. Her cake recipe calls for four eggs for 24 cupcakes, which seems like a lot, but works perfectly. Once you’ve baked them, she asks you to soak them in sugar syrup as well, which seems excessive, but does make a nice moist cake. The buttercream is nice, but I think I’m a bit over how sugary it is. It’s a bit toooo sweet.

Here’s one of my patchwork flowers on the top of a cupcake.

It’s so easy to decorate cupcakes with these – the plungers are really easy to use, and although I curved the petals with a boning tool and set them in a palette, you could skip these steps and they’d still sound great (get me, I sound like I know what I’m talking about!).

I’m still not confident about piping on the buttercream – it never looks as good as other people’s, but luckily I think I’ll have plenty of opportunities to practice!

Here they all are – pretty as a picture! But, please don’t look at my poor little anemone… It broke when I tried to take it out of the palette, and also when I tried to put it on the cupcake. Darn it!
Well, I had a lovely birthday thanks to my family and friends, and a great time trying out sugarcraft properly for the first time… I just wish I knew what to do with rose petal cutters!
Well, I’m overjoyed to see that people are finding my site helpful when they search out specific terms. Hello to the readers today who found me using the terms ‘Peggy Porschen’, ‘potato soup’, ‘horrible story’ and, most thrillingly, ‘grey chicken meat’. I hope I was of use!
Here’s a sneaky preview of my weekend’s activities… I’ll post a full report tomorrow!


